That slow, rhythmic drip from your kitchen or bathroom faucet is more than just an annoyance — a single leaky faucet can waste thousands of gallons of water per year without you even noticing. Knowing how to fix a leaky faucet yourself is one of the most practical home repair skills you can have, and the good news is that most repairs take under an hour and cost very little.
Why faucets start leaking in the first place
Before grabbing your wrench, it helps to understand what’s actually going wrong inside the faucet. Most leaks come down to worn-out internal components — washers, O-rings, cartridges, or ceramic discs — that have simply degraded over time. Water pressure, mineral deposits from hard water, and years of daily use all contribute to wear. In some cases, a loose packing nut is the culprit, while in others the valve seat has corroded. Pinpointing the faucet type you’re dealing with will determine exactly which part needs attention.
The four main faucet types and what leaks mean for each
Not all faucets work the same way, and the repair approach changes depending on the design. Here’s a quick overview:
| Faucet Type | Common Cause of Leak | Key Part to Replace |
|---|---|---|
| Ball faucet | Worn springs or seats | Ball assembly kit |
| Cartridge faucet | Damaged cartridge | Cartridge |
| Ceramic disc faucet | Cracked or dirty disc | Ceramic disc cylinder |
| Compression faucet | Worn rubber washer | Washer or O-ring |
Compression faucets are the oldest design and the most common source of drips — they rely on a rubber washer that physically presses against a seat to stop water flow, and that washer wears out with every single use. Cartridge and ceramic disc faucets are more modern and generally more durable, but they’re not immune to failure.
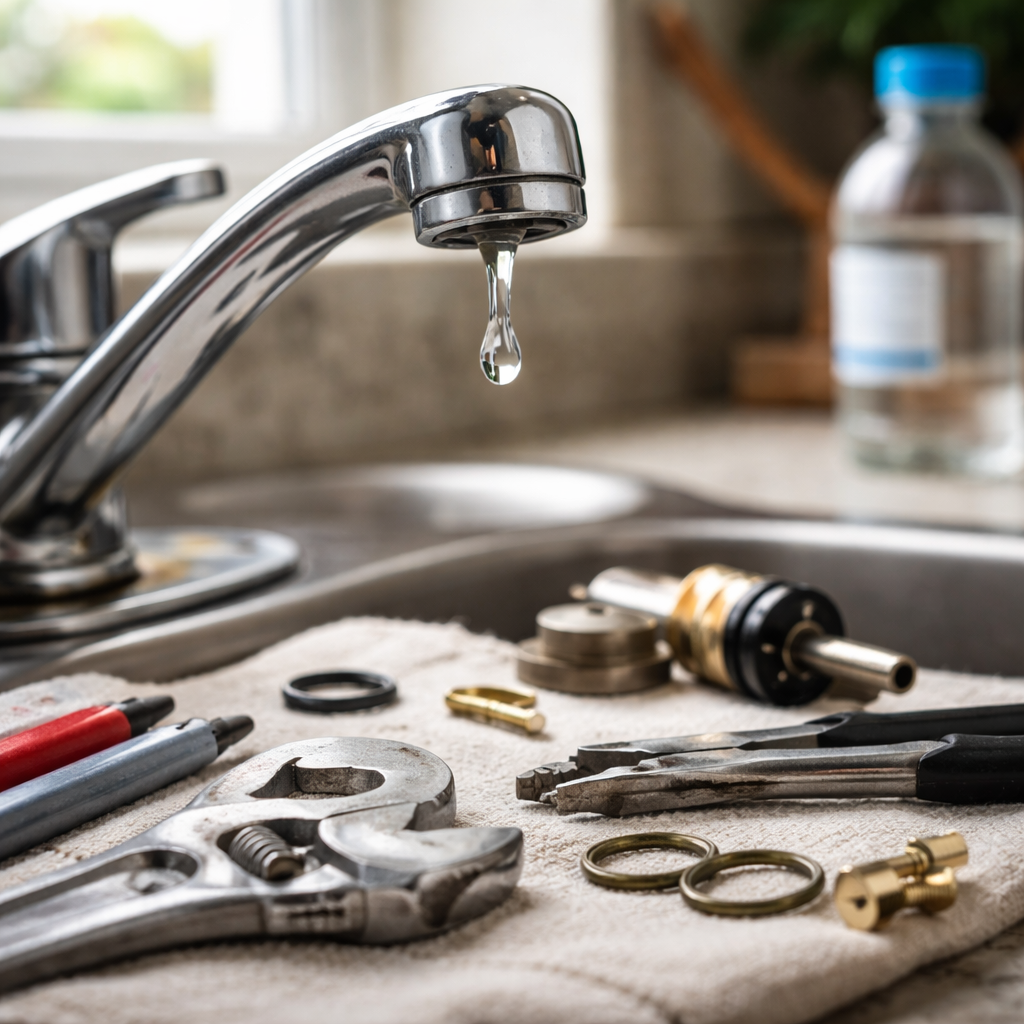
Tools and materials you’ll actually need
There’s no need for a professional toolkit here. Most faucet repairs can be completed with items you likely already own or can pick up inexpensively at any hardware store.
- Adjustable wrench or basin wrench
- Flathead and Phillips screwdrivers
- Needle-nose pliers
- Replacement washers, O-rings, or a faucet repair kit matching your model
- Plumber’s grease (silicone-based)
- White vinegar (for mineral deposit removal)
- Clean cloths or towels
One tip worth remembering: take a photo of the disassembled faucet on your phone before you go to the hardware store. It makes matching replacement parts dramatically easier and saves you a second trip.
Step-by-step: repairing a dripping compression faucet
Since compression faucets are the most frequently repaired, walking through this process gives you a solid foundation for tackling other types as well.
Start by shutting off the water supply. Look under the sink for the shutoff valves — turn them clockwise until they stop. Then open the faucet to release any remaining pressure and drain the water sitting in the line. Place a towel in the sink basin to catch small parts and protect the surface.
Remove the decorative cap on top of the handle (usually pried off gently with a flathead screwdriver), then unscrew the handle screw beneath it and pull the handle off. You’ll now see the packing nut — unscrew it with your wrench and pull out the stem. At the bottom of the stem, you’ll find the rubber washer held in place by a brass screw. This is almost always the part causing the drip.
If the washer looks flattened, cracked, or shiny from wear, replace it. Even if it looks okay, replacing it while you’re already this far in costs almost nothing and prevents another repair visit soon after.
Install the new washer, apply a thin coat of silicone plumber’s grease to the O-rings and stem threads, then reassemble everything in reverse order. Turn the water supply back on slowly and test. In most cases, the drip will be gone completely.
Fixing a cartridge faucet: what’s different
Cartridge faucets — common in single-handle bathroom setups — are actually simpler to repair in some ways because the entire cartridge is replaced as one unit rather than individual small parts. After shutting off the water and removing the handle, you’ll see a retaining clip or nut holding the cartridge in place. Pull it straight out (needle-nose pliers help here) and note which direction it’s oriented before removing it, since reinstalling a cartridge backwards will cause hot and cold to switch.
Take the old cartridge to the hardware store and match it by brand and model number if possible — Moen, Delta, Kohler, and other manufacturers each use proprietary cartridges. Slide the new one in, reassemble the handle, restore water flow, and check for leaks at the base and spout.
When the leak is at the base, not the spout
A puddle forming at the base of the faucet rather than dripping from the spout points to worn O-rings around the body of the faucet rather than the internal valve components. This is especially common with single-handle kitchen faucets that swivel. The repair process involves removing the spout by twisting it up and off (on most designs), then replacing the O-rings seated in grooves around the faucet body. Coat the new rings lightly with plumber’s grease before installing to extend their lifespan and make reassembly easier.
How to know when a repair isn’t enough
Most faucet leaks are entirely fixable without calling a plumber. However, there are situations where replacement makes more sense than repair. If the valve seat is deeply pitted or corroded and a seat wrench can’t resurface it, the entire faucet body may need replacing. Similarly, if you’ve replaced the cartridge or washers and the leak returns within weeks, the faucet body itself may have hairline cracks or damage that no small part can fix.
Faucets more than 15–20 years old with persistent issues are often more cost-effective to replace entirely — modern faucets with ceramic disc valves are notably more durable and water-efficient than older compression designs, and replacement faucets at a mid-range price point are genuinely built to last decades with minimal maintenance.
Your faucet, your call — but the fix is simpler than it looks
The most common reason people call a plumber for a dripping faucet isn’t because the repair is technically difficult — it’s because they’ve never done it before and aren’t sure where to start. Once you’ve worked through the process once, you’ll realize that shutting off the water, swapping a worn washer or cartridge, and reassembling the handle is genuinely within reach for almost anyone. The tools are basic, the parts are inexpensive, and the satisfaction of silencing that drip yourself is hard to overstate. Start with the simplest repair — a compression faucet washer replacement — and build from there. Your water bill will notice the difference.