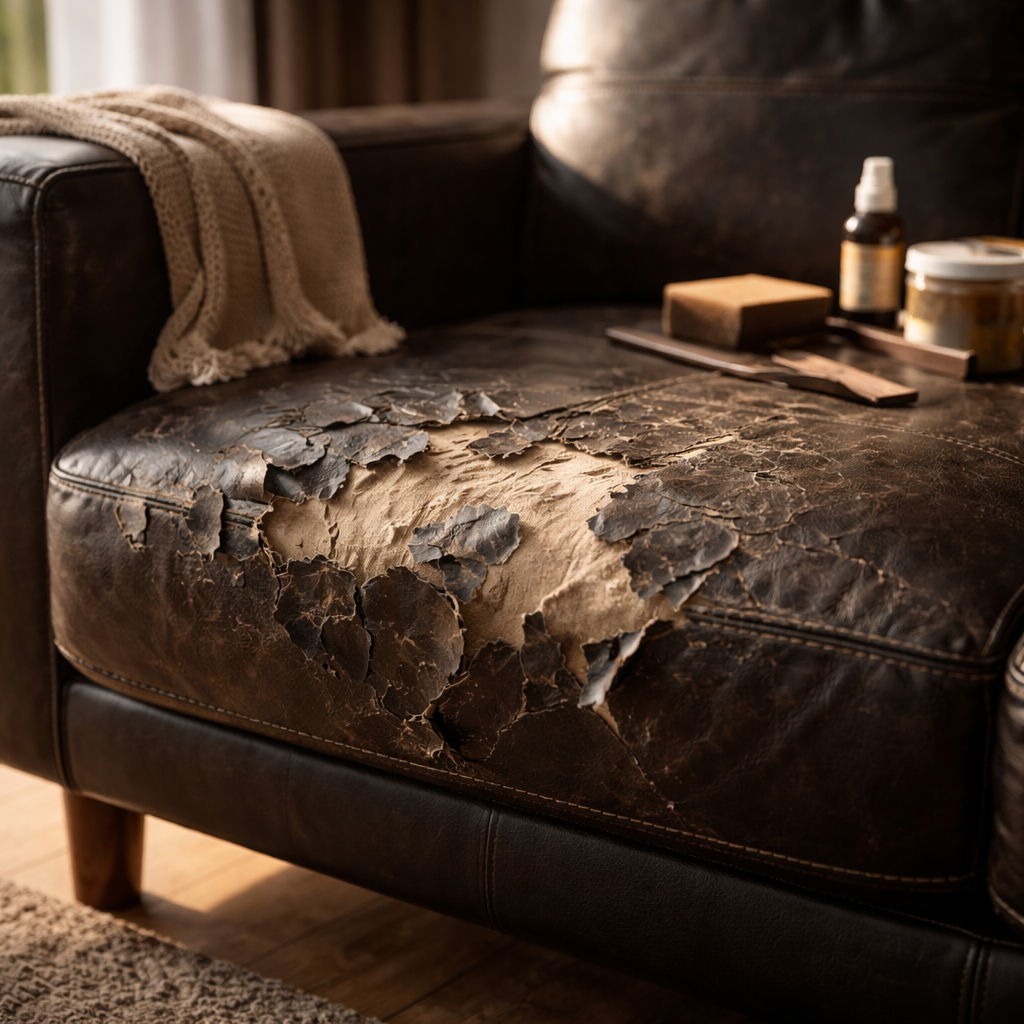
Most people notice it gradually — a small crack near the armrest, then a patch that starts lifting, and before long half the cushion looks like it’s shedding its skin. If you’re trying to figure out how to fix a peeling leather sofa without spending a fortune on a replacement or a professional reupholstery job, the good news is that most cases are entirely manageable at home with the right approach and materials.
Why leather sofas peel in the first place
Before reaching for a repair kit, it helps to understand what you’re actually dealing with. True full-grain or top-grain leather rarely peels — it cracks and dries out, but it doesn’t shed layers. What most people call a “leather sofa” is often bonded leather or PU leather, which is made by binding leather scraps or synthetic fibers together and coating them with a polyurethane surface layer.
That surface coating is what peels. Over time, with heat, friction, body oils, and lack of conditioning, the bonding breaks down and the top layer separates from the base material. This is a structural issue with the material itself, not just surface damage — which matters a lot when you’re choosing a repair strategy.
Assess the damage before you start
The repair approach depends entirely on how far the damage has spread. A quick assessment saves you time and money.
| Damage Level | What It Looks Like | Best Approach |
|---|---|---|
| Minor | Small cracks, slight surface peeling in one area | Leather filler + colorant |
| Moderate | Peeling across several sections, some base visible | Full patch repair + sealer |
| Severe | Widespread flaking, large areas of exposed backing | Sofa covers or professional help |
If the peeling is localized — say, one armrest or a single cushion — a DIY repair can restore both appearance and function. If the damage covers more than 40–50% of the surface, a full restoration becomes labor-intensive and the results may not hold for long.
What you’ll actually need
You don’t need a professional toolkit, but a few specific products make a real difference. Generic craft glue and house paint won’t give you lasting results. Look for products designed for leather or vinyl repair.
- Leather repair kit (includes filler compound and colorant — brands like Leather Hero or Fortivo are widely available)
- Fine-grit sandpaper (400–600 grit) for smoothing edges
- Rubbing alcohol or leather cleaner for surface prep
- A palette knife or spatula for applying filler
- A soft sponge or applicator pad
- Leather sealant or finisher to protect the repaired area
- Leather conditioner for ongoing maintenance
Color matching is often the trickiest part. Many repair kits come with a mixing guide, but if you’re unsure, test on a hidden area first — underneath a cushion or along the back of the sofa where it sits against the wall.
Step-by-step repair process
Work in a well-ventilated space and give yourself enough time — rushing the drying stages is the most common reason repairs don’t hold.
Start by removing all loose and flaking material. Use your fingers or a soft brush to gently peel away anything that’s already detached. Leaving it underneath new filler creates bubbles and leads to faster re-peeling. Once the loose material is gone, clean the area thoroughly with rubbing alcohol and let it dry completely.
Next, lightly sand the edges of the damaged area so there’s a gradual transition rather than a sharp border. This helps the filler blend in more naturally. Wipe away any dust before moving on.
Apply the leather filler in thin layers using a palette knife, spreading it slightly beyond the damaged area. Thick single applications tend to crack when the sofa flexes. Let each layer dry for 20–30 minutes before adding the next. Two to three thin coats typically give better results than one heavy coat.
Thin layers are everything in leather repair. One thick coat might look fine when dry but will crack the first time someone sits down. Patience here directly affects how long the repair lasts.
Once the filler is fully dry, lightly sand the surface again with fine-grit sandpaper to smooth any texture inconsistencies. Then apply the colorant using a sponge in circular motions. Build up color gradually — it’s easier to add than to take away. Allow each coat to dry before applying the next.
Finish with a leather sealant or topcoat. This step is often skipped but it’s what protects everything underneath and gives the surface its durability. Apply one or two thin coats and allow them to cure fully — usually at least a few hours before any use.
A practical tip worth knowing
If the texture of the repaired area doesn’t match the rest of the sofa, you can use a textured pad that comes with many repair kits. These pads are pressed into the wet filler to mimic the grain pattern of the surrounding material. It sounds fiddly but it genuinely improves how seamless the result looks.
Another option for moderate to large damage areas is a leather repair patch. Self-adhesive patches designed for sofas can cover significant areas quickly and are particularly useful on flat sections like seat backs or cushion fronts. They’re not invisible, but they’re far more presentable than exposed flaking.
Keeping the repair from coming undone
Repairs on bonded or PU leather have a natural lifespan because the underlying material continues to break down. That said, regular care can significantly slow the process.
- Apply a leather or vinyl conditioner every two to three months — this keeps the surface flexible and reduces cracking
- Keep the sofa out of direct sunlight, which accelerates material breakdown
- Avoid sitting in the same spot repeatedly, which creates uneven wear pressure
- Clean spills immediately with a slightly damp cloth rather than soaking the surface
- Use armrest covers or throws on high-wear areas to reduce friction
None of these are complicated habits to build, but together they extend the life of both the original material and any repairs you’ve made.
When a repair is worth it — and when it isn’t
A DIY repair makes sense when the sofa is structurally sound, the damage is contained, and you want to extend its life by a few more years without a major investment. It also makes sense as a temporary solution while you save up for a replacement.
On the other hand, if the peeling is extensive and the base fabric is showing across most surfaces, the honest answer is that no amount of filler will give you a result you’ll be happy with long-term. In those cases, high-quality sofa slip covers are often the most practical path — they’re affordable, they come in a range of styles, and they require zero restoration skill.
The decision doesn’t have to be all-or-nothing. Many people repair the most visible areas, cover the rest with throws, and get several more years out of a sofa they like. Practicality over perfection is a perfectly reasonable approach.